The MFMailComposeViewController class provides access to the same interface used by the
Mail client to edit and send an email. The most common way to present this
interface is to do so modally using the presentModalViewController:animated:
method, just as we did in the preceding section to create a
reusable web view class.We can therefore reuse our Prototype application code from the
preceding section to demonstrate how the mail composer works; we’ll just
drop in a class that displays the mail interface instead of the web
interface. Open the Finder and navigate to the location where you saved
the Prototype project. Right-click on the folder
containing the project files and select Duplicate; a folder called
Prototype copy will be created containing a duplicate
of our project. Rename the folder Prototype2, and
then open the new (duplicate) project inside Xcode and use the
Project→Rename tool to rename the project
itself.
Next, prune back the code:
Open the copy of the project in Xcode and delete the
WebViewController.h,
WebViewController.m, and
WebView.xib files by right-clicking on each file
in the Groups & Files pane and selecting Delete from the pop-up
menu. When prompted, click Also Move to Trash. If you moved
WebView.xib into your Resources folder with the
rest of the NIBs, look for it there.
Now click on the PrototypeViewController.m
file to open it in the editor. Delete the line where you import the
WebViewController.h file and delete all the code
in the pushedGo: method, but not
the method itself.
At this point, we have just the stub of the application, with that
Go! button and associated pushedGo:
method we can use to trigger the display of our mail composer view. So,
let’s write the code to do that now.
The first thing we need to do is add the MessageUI.framework framework to the
project. As you did earlier for the
SystemConfiguration.framework, right-click on the
Frameworks group and select Add→Existing
Frameworks. Then select the MessageUI.framework from
the list presented in the framework selection pop-up window.
Warning:
If you have upgraded your Xcode (and iPhone SDK) distribution in
the middle of developing a project,
MessageUI.framework may not show up in the list of
frameworks presented to you by Xcode in the framework selection pop up.
If this turns out to be the case, you may be able to resolve the problem
by opening the Targets group in the Groups & Files pane in Xcode,
right-clicking on the application’s target, and selecting Get Info.
Navigate to the Build pane of the Target Info window and set the Base
SDK of your project to the SDK you currently have installed (rather than
the SDK with which you initially developed the project).
We’re going to present our mail composer view when the Go! button is
clicked using our pushedGo: method.
However, before we do, we need to see if the device is even configured to
send email, using the canSendMail: class
method. If it isn’t, we need to inform the user that the device isn’t able
to send mail. When writing a real application that relies on email being
available, you might want to do this check when the application starts
inside your application delegate, and then either inform the user that
there is a problem or disable the parts of your application that depend on
it being able to send mail. Add the following code to the pushedGo: method in
PrototypeViewController.m:
-(IBAction) pushedGo:(id)sender {
  if (![MFMailComposeViewController canSendMail]) {
				      NSString *errorTitle = @"Error";
				      NSString *errorString =
				      @"This device is not configured to send email.";
				      UIAlertView *errorView = [[UIAlertView alloc] initWithTitle:errorTitle
				         message:errorString
				         delegate:self
				         cancelButtonTitle:nil
				        otherButtonTitles:@"OK", nil];
				       [errorView show];
				       [errorView release];
				  } else {
				       MFMailComposeViewController *mailView =
				        [[[MFMailComposeViewController alloc] init] autorelease];
				       mailView.mailComposeDelegate = self;
				       [mailView setSubject:@"Test"];
				       [mailView setMessageBody:@"This is a test message" isHTML:NO];
				       [self presentModalViewController:mailView animated:YES];
				  }
}
The mail
composer view won’t dismiss itself when the user clicks the Send or Cancel
button. We need to know when it is dismissed by the user; for that to
happen we must implement the MFMailComposeViewControllerDelegate
protocol. We therefore need to import the framework headers into the
PrototypeViewController.h interface file, which we do
by importing the MessageUI.h header file:#import <MessageUI/MessageUI.h>
We also have to declare our PrototypeViewController as a delegate class for
the mail view by changing the declaration in
PrototypeViewController.h, as shown here:
@interface PrototypeViewController : UIViewController
  <MFMailComposeViewControllerDelegate> {
  ... no changes to the code in here ...
}
The delegate protocol implements only one method, which dismisses
the view controller and handles any
errors: the mailComposeController:didFinishWithResult:error:
method. Let’s implement that now as part of our PrototypeViewController class. Add the following
method to PrototypeViewController.m:
-(void)mailComposeController:(MFMailComposeViewController *)controller
  didFinishWithResult:(MFMailComposeResult)result error:(NSError *)error {
    if (error) {
        NSString *errorTitle = @"Mail Error";
        NSString *errorDescription = [error localizedDescription];
        UIAlertView *errorView = [[UIAlertView alloc]
          initWithTitle:errorTitle
          message:errorDescription
          delegate:self
          cancelButtonTitle:nil
          otherButtonTitles:@"OK", nil];
        [errorView show];
        [errorView release];

    } else {
        // Add code here to handle the MFMailComposeResult
    }

    [controller dismissModalViewControllerAnimated:YES];
}
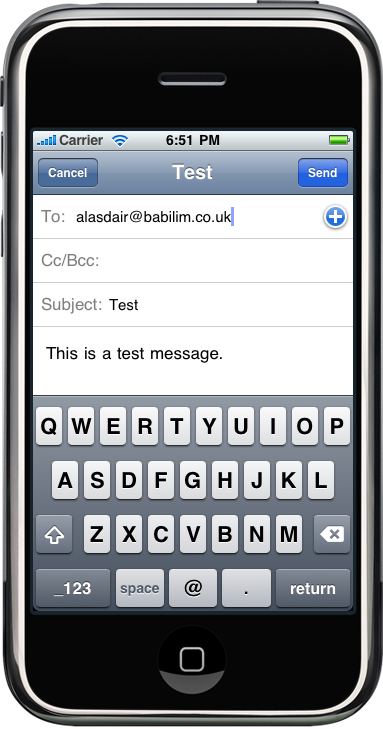
Before we discuss how to handle the MFMailComposeResult, let’s test our code. Click
the Build and Go button on the Xcode toolbar to compile and start the
application in iPhone Simulator. Once the application opens, click the Go!
button. If all goes well, you should see something very similar to Figure 1.
Now that the application is working, let’s handle that MFMailComposeResult. The simplest way to
illustrate how to handle the result is to add a label to the PrototypeViewController NIB file, and display
the result returned by the mail composer view there.
The first thing you need to do is to add a UILabel to the
PrototypeViewController.h interface file and declare
it as an IBOutlet. Add the line shown
in bold:
#import <UIKit/UIKit.h>
#import <MessageUI/MessageUI.h>

@interface PrototypeViewController : UIViewController
<MFMailComposeViewControllerDelegate> {
    IBOutlet UIButton *goButton;
    IBOutlet UILabel *resultLabel;
}

-(IBAction) pushedGo:(id)sender;

@end
Remember that now we’ve declared the label variable, so we also need
to release it inside the dealloc:
method. Add the following to the dealloc: method in
PrototypeViewController.m:
[resultLabel release];
We also need to open the
PrototypeViewController.xib file in Interface Builder
and add the label. Open the NIB file and then drag and drop a label
(UILabel) from the Library window onto
the view. Now right-click on File’s Owner and connect the resultLabel outlet to the new UILabel. Make sure you save your changes to the
NIB file, and then return to Xcode.
Now we can use the label to display the results. Inside the mail
composer delegate method, replace the line that reads // Add code here to handle the
MFMailComposeResult with the following code:
NSString *string;
switch (result) {
case MFMailComposeResultSent:
string = @"Mail sent.";
break;
case MFMailComposeResultSaved:
string = @"Mail saved.";
break;
case MFMailComposeResultCancelled:
string = @"Mail cancelled.";
break;
case MFMailComposeResultFailed:
string = @"Mail failed.";
break;
default:
string = @"Unknown";
break;
}
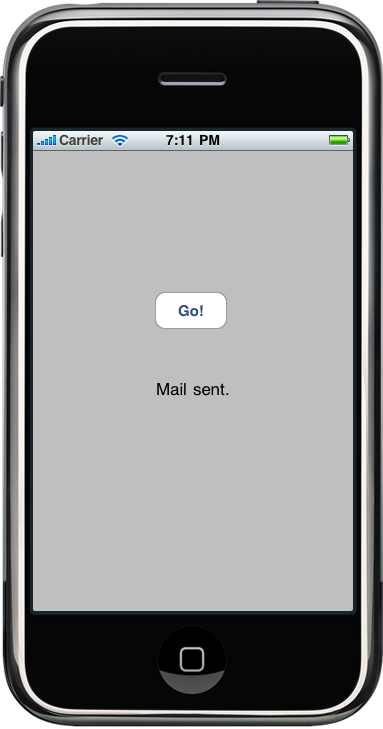
resultLabel.text = string;
The switch statement we just
added enumerates the possible results, and then sets the label string to a
human-readable result. We’re done. If you build the application again and
send an email from the composer view, you should see something very much
like Figure 2.
You can attach an image to your mail message by using the
addAttachmentData:mimeType:Filename: method.
This should be called before displaying the mail composer interface,
directly after the call to the setMessageBody:isHTML: method. You should not
call this method after displaying the composer interface to the
user.
If necessary, you can change the image type using the UIImageJPEGRepresentation() or UIImagePNGRepresentation() UIKit function, as
shown here:
UIImage *image = [UIImage imageNamed:@"Attachment.png"];
NSData *data = UIImageJPEGRepresentation(image, 1.0);
[mailView addAttachmentData:data mimeType:@"image/jpeg"
   fileName:@"Picture.jpeg"];
This example will look for Attachment.png at
the root of the application bundle (to put a file there, drag it into
the top level of the Groups & Files pane), convert it to a JPEG, and
attach it under the filename Picture.jpeg.